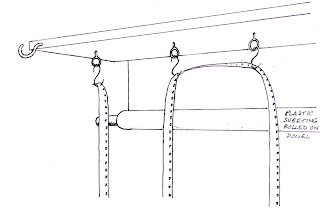
Get a plastic-covered board about 2 metres long and screw on eyelets at regular intervals. Make a number of S-hooks out of wire, to support the film by its perforations. It's a good idea to use a file to taper one end to a point to make it easy and quick to hook on the film.
The board is hung or supported near the ceiling of a relatively dust-free room. Maybe use hooks to do this. A large plastic sheet about 4.5 metres long is taped to the back edge of the board. The other end is attached to a piece of doweling. Fit two suitably sized hooks to the front edge of the board, to hang the dowel.

You will also need a length of card about the same width as the board. Also a good quality sponge: simply cut a slit into it with scissors. Oh, and some clothes pegs.
After processing and thoroughly washing your film, give it a final rinse in distilled water, to remove any chalky deposits if you live in a hard water area. Then add a few drops of wetting agent and give the processing spiral a final swish. Rinse the sponge and squeeze almost dry. Take the spiral out of the developing tank, and attach the end of the film to the first S-hook. As the spiral is turned the film should unwind easily. This is always an exciting moment as you see the frames of film for the first time, but try and resist too long a look as there are specks of dust homing in ! Work quite fast but with great care. Have a clean chair handy to place the spiral on (unless you have three hands). Now with about 2 metres of film unwound, turn your attention to the sponging. Hold the film near the top by its edges, attach the sponge by its slit, then pull gently along it. Unwind another 2 metres of film and place the spiral on top of the board, while you sponge that length. Then very carefully attach the film by a perforation onto the next S-hook. Then onto another nearby hook so as to keep the loops apart and hanging nicely.
Carry on like this until the whole film is unwound and hanging in long loops nearly to the floor. Depending on the length of film you may have to double back with more hooks along the board. Always ensure that the sponge is wrung out and scrupulously clean, then it will never scratch the soft film.
Finally, unroll the plastic sheeting from behind the loops of film, and near the floor place the length of card onto it. This weighs down the sheet and ensures it doesn't touch the film. Unroll the rest of the sheet and hang up the dowel. Peg the sides of the sheet together but allow considerable gaps for air to pass through. You now have a virtually dust-free container. Leave the film in it for maybe 12 hours, as you want it bone dry before it's wound onto a spool to project. Hopefully, you'll find your film in pristine condition, without any dirt or marks. If you still see the odd chalky mark, which doesn't harm the film incidentally, it can be removed with a soft cloth.
The key to decent results is absolute cleanliness. If you can't find a room without dust, try commandeering the bathroom, in fact the bath might be a good place to hang the film and easy to cover.
And, for those who haven't yet tried home-developing, it's a fantastic feeling to project the film knowing you've done it ALL yourself. !
